11 simple tips to secure your WordPress website.
Marc Wagner
June 11, 2021
WordPress is one of the most used content management systems in the world. Which also makes it more and more attractive for bots and hackers.
Is WordPress safe? #
As a rule, yes. Of course, it depends on many aspects. For one, is WordPress regularly maintained by you? Are plugins used and if so, are they still up to date? The same applies to the theme. Has a firewall been set up (WAF)? What about the passwords? Many questions. Most of the time the problem is in front of the screen. Because your system is only as good as you treat it.
This is not to say that there are no vulnerabilities for WordPress. Like your operating system, WordPress is also affected. Through regular updates, but these are closed as soon as they were detected.
What are the vulnerabilities of WordPress? #
Here is a list of WordPress security vulnerabilities:
- Backdoors
- DDoS Attacks
- Brute-Force Attacks
- Cross-Site-Scripting (XSS)
Backdoors
This exploits outdated plugins or security holes in plugins, themes and WordPress itself to open a backdoor to your WordPress website.
Most of the time, it modifies files. A malicious code is inserted that allows remote access to your data. Most of the time, these changes to your PHP files look like a random sequence of characters. This is because the PHP functions are first encoded with Base64. Using Eval, the string can then be easily interpreted as PHP code.

Looks harmless at first. However, there may be a lot behind it, for example a script that automatically copies data from another server to you and executes it.
Backdoors can be fixed quickly. First, you should check whether you have any vulnerabilities. If so, you should close the affected areas with an update. By changing file permissions and excluding PHP files from various folders, you can already combat numerous threats.
Brute-Force Attacks
This is the term used to describe automated attacks that use simple passwords to gain access to your website. To prevent this, you should definitely limit the login attempts to your system. Blocking IP addresses and using strong passwords will also help to control the problem.
Cross-Site Scripting (XSS)
Cross-site scripting is what it is called once a malicious script is injected into a trusted website or application.
The malicious code is usually inserted into the system via unsecured input options (forms). These are often scripts that are executed in the visitor’s browser (JavaScript).
This is an attempt to grab the visitor’s data. This includes credit card information, for example. But also the redirection to other websites or the insertion of advertising (spam) is part of it.
DDoS Attacks — Denial-of-Service
In a DDoS attack, errors and bugs in the code are exploited to overload the server. The target is continuously addressed via various servers. This is referred to as a botnet. Smaller websites are therefore often infiltrated in order to use them to launch a DDoS attack on a larger target.
Your WordPress Security Guide for 2021 #
To prevent your WordPress website from becoming a target of an attack, you should follow these security tips.
Do not use default names for users
Attacks on WordPress are usually automated. This means that a script (bot) tries to gain access to your WordPress using predefined methods.
Developers of these bots of course know that admin is the default username for WordPress administrators.
So write a list of potential names the bot will try to log in with in order.
Of course, this also applies to passwords. There are countless lists of password combinations on the Internet that are simply played through.
For example, you can check whether you have ever been found on the web with your email or phone number on Have I Been Pwned.
Bots are now programmed to search for names and email addresses on the website as well, which you then test for login.
Unfortunately, WordPress does not offer the possibility to change usernames afterwards. Therefore, here are two variants how you can do it without a plugin:
- Create a new admin user and then delete the old one.
- Customize the username directly from the database.
Secure your wp-config
The wp-config.php is by far the most important file on your system. Therefore, you should pay special attention to it when it comes to the security of your WordPress website.
It contains the database login data and security keys. The security keys are responsible for encrypting your cookie information.
Disable editing of files
WordPress has an internal code editor. This allows you to edit theme and plugin files via WordPress.
If an attacker succeeds in logging into WordPress, he can also edit these files. Often you don’t even notice this.
To prevent this from happening, all you have to do is add the following line to your wp-config.php:
define('DISALLOW_FILE_EDIT', true);The whole thing then looks like this:

Move the wp-config.php
Usually, wp-config.php is located in the root directory of your website. However, you can move it to any other directory that is not accessible via WWW.
To move your wp-config.php file, simply copy the complete content into another file. Then save this file in a directory of your choice.
Then write the following line in your wp-config.php:
<?php
require_once('/pfad/zu/deiner/datei.php');
This prevents your PHP from being downloaded at random if there is a hosting error. This can happen, for example, if PHP has not been set up or is no longer working properly due to an error. Instead of interpreting the file, the server then offers it as a download. Due to this error, the file can then be opened, and your data can be read.
Update security key for WordPress
The security keys improve the encryption of information stored in users’ cookies. They consist of a series of random characters.
During the installation of WordPress, these are generated automatically. But it can be useful to renew them, for example after moving your website.
For this, WordPress offers you a free tool with which you can generate the security keys. Just open the link and replace the security keys in your wp-config.php file.

Customize file permissions
File permissions allow you to specify who can access the file or folder. File permissions can be changed with an FTP client such as FileZilla.
Connect to your server with your FTP client and navigate to the WordPress directory. Right-click on a file/folder to open the context menu.

At the bottom of the list of options, you will find the entry File Permissions. Click on it to change the file attributes.

There you can easily set the permissions. Attention: By changing the file permissions you can damage your website. You should therefore only make the changes if you are familiar with them.
In the WordPress documentation, you can find the file permissions guidelines.

Accordingly, you should set the file permissions for wp-config.php to 440 or 400.
Disable running PHP for directories
You can prevent the execution of PHP files for individual directories. For example, one of the directories where PHP files have no place is /wp-content/uploads/.
With the help of a .htaccess file we can disable the execution of PHP files:
- Create a new .htaccess file in the /wp-content/uploads/ directory of your WordPress installation. Note: The .htaccess file will then also affect all subfolders in the directory.
- Insert the following content there
<Files *.php>
deny from all
</Files>
You have now made all PHP files in the directory unusable.
Limit the number of login attempts
Next, be sure to set a limit for login attempts.
Attackers often try to gain access to the system by entering different usernames and password combinations. If you don’t set a limit here, attackers can try to guess your passwords every second.
For this, you can use a security plugin like Sucuri or Limit Login Attemps Reloaded.

You can directly use the default settings. If you have a static IP address, you can store it directly.
Hereby you ensure that after 3 incorrect logins from an IP address, this will be blocked for further logins for 20 minutes. In addition, the IP address will be blocked for 24 hours if it has already been blocked 4 times within 24 hours.
As an extra, you can also be notified by e‑mail as soon as a blocking has taken place.
Change WordPress database prefix
WordPress is assigned a database prefix by default during installation. This is, if you have not changed it wp_.
You can customize and assign this prefix individually during the installation of WordPress.
Therefore, the easiest way is to change the prefix directly during installation. But it can also be done afterwards. For this, both the database and the wp-config.php would have to be adjusted.
Since changing the prefix can damage the page, you should only do this if you have experience with databases and programming. Otherwise, you should hire a professional.
Disable Directory Indexing and Directory Browsing
Attackers usually browse directories on your server to find possible targets and vulnerabilities. Although many web hosts now disable directory indexing and directory browsing by default, there are still some exotic ones.
Just test if directory indexing is enabled on your WordPress website by calling the path: /wp-includes/
If you now get a view like the one below, you should definitely read on.

So that potential attackers can not see this, you simply open the .htaccess file in the main directory of WordPress (there is also the wp-config.php file).
Add the following line to disable directory indexing and directory browsing:
Options -IndexesTest the URL again after saving and uploading. Now you should see a 403 error (Forbidden) instead of the directory.
Disable XML-RPC interface
The XML-RPC interface is enabled by default, but is hardly used nowadays. In the meantime, it has been replaced by the REST API introduced on WordPress.
Meanwhile, it is mostly used to perform brute force attacks, and DDoS attacks.
You should therefore check whether the interface is still activated. The best way to do this is to use the WordPress XML-RPC Validation Service.

Just add the link to your website to the address and complete it with xmlrpc.php.
If you have XML-RPC active, you will get the following message:

Now you should take action. To disable XML-RPC, you have several options.
Disable XML-RPC via a filter
To do this, open Functions.php from your child theme and add the following line:
add_filter( 'xmlrpc_enabled', '__return_false' );Disable XML-RPC via .htaccess
Open the .htaccess file which is located in the root directory of WordPress. There you add the following lines:
<Files xmlrpc.php>
Order Allow,Deny
Deny from all
</Files>
This will prohibit access to the file.
Regular backups of the website and database
You should regularly back up your website and database to an external server.
A backup on your own server is often not enough. Especially if you use existing plugins, bots know where backups are stored. It often happens that the backups are deleted or infected as well.
An external backup is therefore indispensable for essential areas. For this you can use for example the UpdraftPlus WordPress backup plugin.

From the dashboard, you can then start your first backup of your files and database directly with Back up now.
In addition, you can also specify other settings.

In addition to the frequency of backups and the retention of backups, you can also configure an online storage where the data will be saved.
So if you don’t want to keep downloading backups manually, you should configure an online storage.
You can also sign a maintenance contract for your WordPress website directly with us. In addition to backups and maintenance, we also take care of updating your website and ensure security.
Disable debug mode
Debug mode should be enabled only when there is a problem with your website. As soon as it is activated, additional information is displayed for developers. This may include sensitive data. These can then be tapped by potential attackers in order to find security vulnerabilities.
To disable the debug mods, you need to modify the following line of code in your wp-config.php file:
define('WP_DEBUG', false);Regularly update WordPress, themes and plugins
Another way to improve your WordPress security is to regularly update plugins, themes and WordPress itself.
Security enhancements and bug fixes are also often added during the update process.

Unfortunately, I have to see again and again that many customers come to us with outdated WordPress versions. Mostly with simple reasons like “then the site no longer runs” or “our changes in WordPress are then gone”.
In doing so, changes should never be made to WordPress, plugins or themes. This is what hooks and child themes are for.
In addition, WordPress updates usually contain indispensable security patches.
Note: You should always back up your website and database before updating.
How to update WordPress
As soon as an update is available for WordPress, you will be notified via the dashboard.
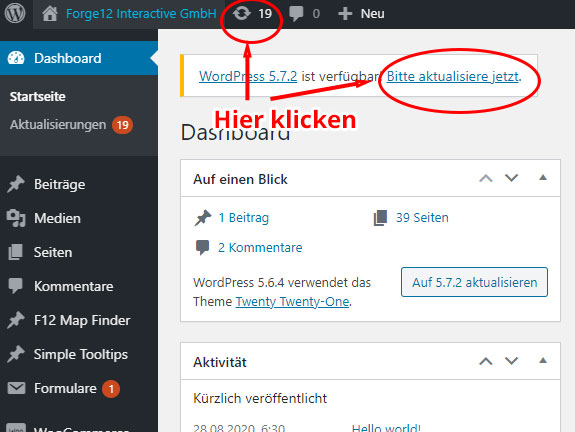
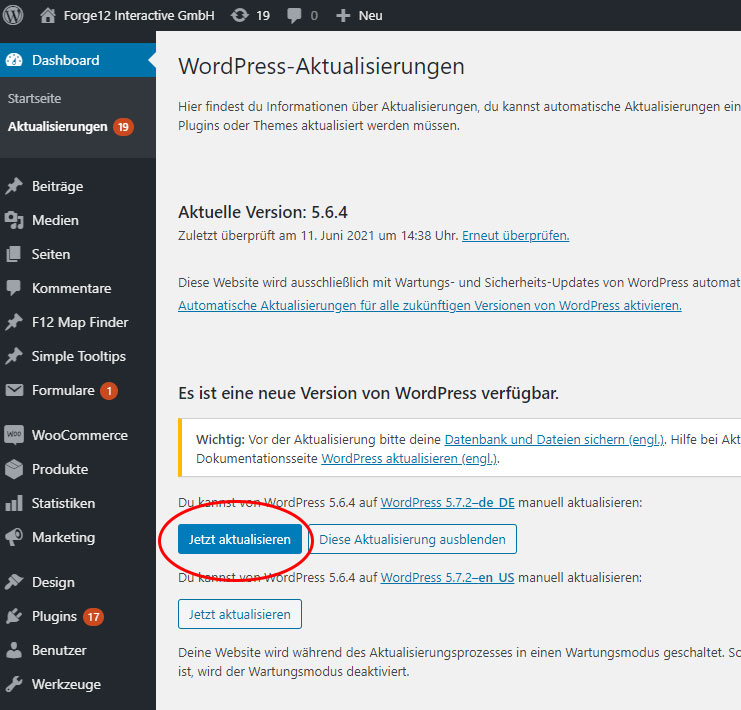
Alternatively, you can download WordPress manually and upload it to your server using SFTP. Important: Overwriting files or folders, if not done correctly, can damage your website.
How to update WordPress plugins
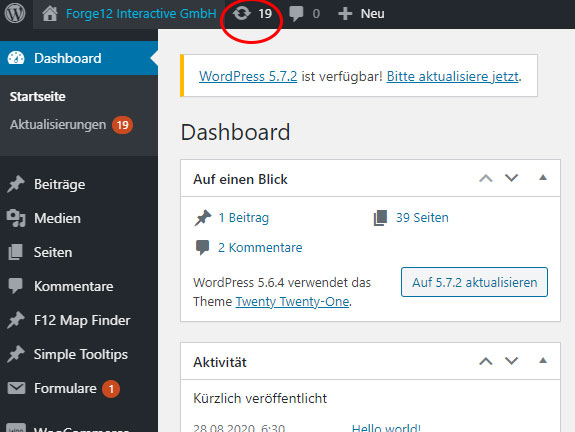
WordPress plugins are also easy to update. Click on the update icon on the dashboard and then select the plugins you want to update. Confirm the process by clicking the Update Plugins button.
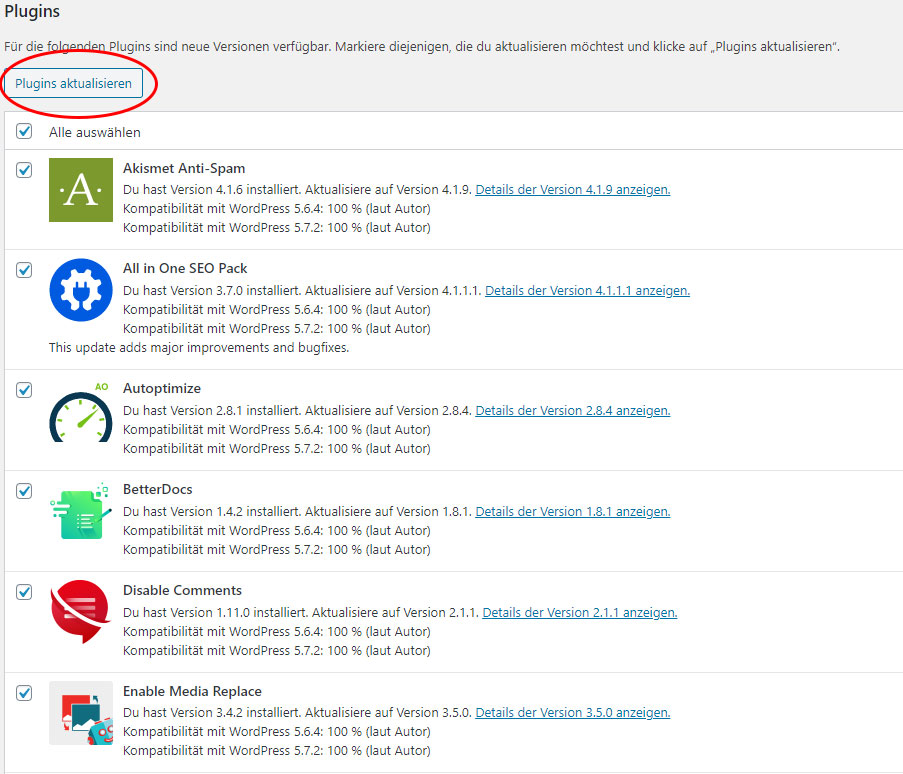
If you have purchased premium plugins via a third party provider, it may not be possible to update them via WordPress. You should therefore always check the plugins manually for an update.
To do this, you can usually download the files manually from the vendor and upload them manually to your server using SFTP. The files for the plugins are located in /wp-content/plugins.
To increase the security of your WordPress website, you should always check when choosing plugins when they were last updated. Plugins that are not updated regularly or have not been updated for a long time should be avoided.
Security through obscurity (Security through obscurity)
Also known as security through obscurity. An attempt is made to increase security by keeping information secret. Whether the use is useful or not is controversial. Nevertheless, the principle can also be applied to WordPress.
Hide the WordPress version
The less the person knows about your system, the better. Therefore, you should hide the WordPress version you are using.

This can be done without any plugin at all. Just add the following to the functions.php file of your child theme (wp-content/themes/child-theme/functions.php):
function removeWordPressVersion() {
   return '';
}
add_filter('the_generator', 'removeWordPressVersion');
That was it already. Now the WordPress version should no longer be displayed.
Change WordPress Login URL
Another way to incorporate the principle of obscurity into WordPress is to obfuscate the login URL.
All bots, hackers and potential attackers know the path to the WordPress login file. By means of brute force attacks, they then try to log in. Of course, changing the URL is not a solution, but a little trick. Once the attackers know that your login URL has been changed, they will adjust it.
To change the path to your login page, you can use the WPS Hide Login plugin.
Summary #
As you can see, WordPress can be optimized with little effort to increase security. By choosing alternative usernames, secure passwords and performing regular updates, you can ensure that your website stays up and running.
Did we forget anything or do you have the ultimate tip on how to secure your WordPress website? Then let us know in the comments.
Artikel von:
Marc Wagner
Hi Marc here. I’m the founder of Forge12 Interactive and have been passionate about building websites, online stores, applications and SaaS solutions for businesses for over 20 years. Before founding the company, I already worked in publicly listed companies and acquired all kinds of knowledge. Now I want to pass this knowledge on to my customers.
