WordPress Errors & MaintenanceApr 17, 2023
Increase WordPress Upload Limit: Guide
How can you increase the WordPress upload limit? It's simple, to increase the upload limit (the maximum file size of an upload), you need to adjust the PHP settings on your server. The hosting provider often restricts the maximum size for files that can be uploaded to the server, usually for security reasons. Therefore, we will show you how to increase the limit.
Standard Hosting Solution to Increase the Upload Limit
Many hosting providers now allow you to adjust the upload limit in the settings. To do this, log in to your host (e.g., all-inkl, Strato, IONOS) and look for the PHP/PHP.ini settings. There, you should generally have the option to set a value.
Unfortunately, each provider has individual names, menus, and settings. However, the following keywords should help you find the settings: PHP/PHP.ini, upload_max_filesize, post_max_size.
If you can't find a setting for this, a call to your hosting provider or the following solution will help.
Increase Upload Limit with a Custom PHP.ini Configuration File
Some hosting providers allow you to override settings from the PHP.ini. To do this, simply create a php.ini file in the root directory of your website. Please note that your hosting provider decides which settings can be overridden. Therefore, it may happen that the settings, even if you have included them correctly, are not loaded.
Connect to your website using an FTP client (e.g., FileZilla) and create a php.ini file in the main directory.
Then open the file with an editor (e.g., Notepad++) and insert the following lines:
post_max_size = 64M
upload_max_filesize = 64M
In our example above, we have increased the limit to 64 MB. You can of course adjust the value to your needs, e.g., 32M, 128M, 256M.
Increase Upload Limit with .HTACCESS
Connect via FTP to your web host. Open the .HTACCESS file (this is located in the main directory of your WordPress installation) with a text editor (e.g., Notepad++). Then add the following lines to the beginning or end of the file to increase the upload limit:
php_value upload_max_filesize 64M
php_value post_max_size 64M
Note: Not all hosts allow changing PHP parameters via .HTACCESS.
Increase Upload Limit with PHP
Open the functions.php file (this is located in your child theme in the directory "wp-content/themes/{Child-Theme-Folder}/functions.php") with a text editor (e.g., Notepad++). Then insert the following lines directly after "
@ini_set( 'upload_max_size', '200M' );
@ini_set( 'post_max_size', '200M');
Note: Not all hosts allow changing PHP parameters via script.
Increase Upload Limit via Plesk Panel
Locally, for Individual Domains
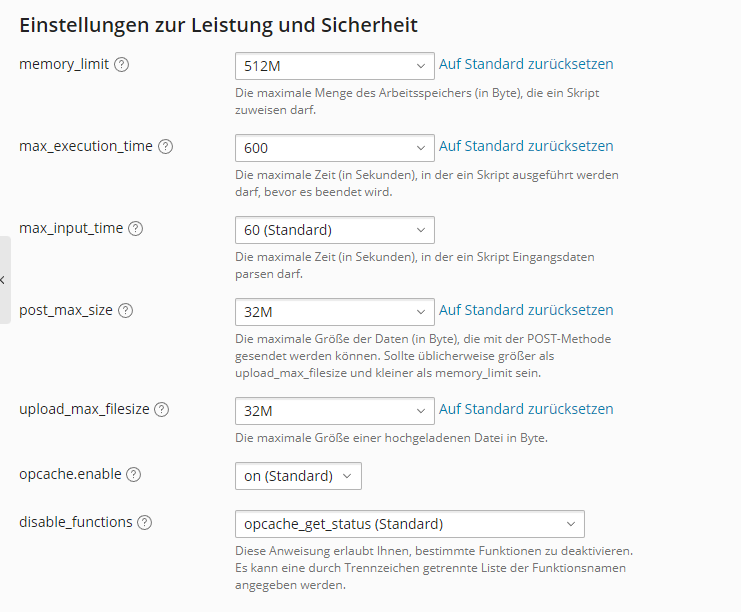
Log in to your Plesk Panel and then navigate to Domains > {Top-Level-Domain} > PHP Settings. There, you can directly adjust the values for post_max_size and upload_max_filesize.
Globally, for All Domains
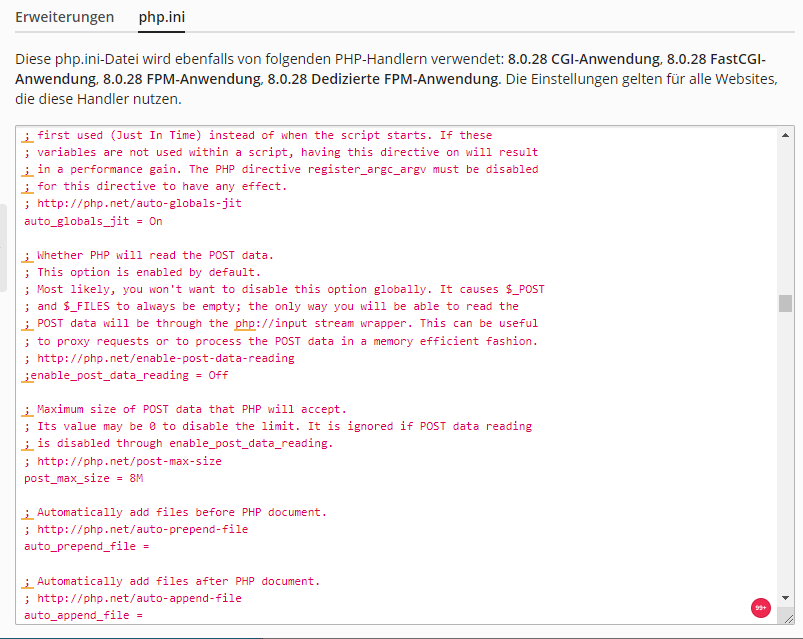
If you want to adjust the settings globally for all domains using a specific PHP version, you can edit the PHP.ini file. To do this, go to Tools & Settings > PHP Settings > { PHP Version } > php.ini. Here you can now edit the configuration file. Look for post_max_size and upload_max_size and adjust the values according to your wishes.
Conclusion
To increase the upload limit for WordPress, you need to adjust the values of post_max_size and upload_max_size either in your provider's hosting settings or directly in the PHP.ini. For some outdated hosting providers, a phone call may even be necessary.
Alternatively, you can switch to a more modern hosting provider (e.g., all-inkl). We would be happy to assist you with the WordPress migration or you can book a WordPress maintenance package with us, and we will take care of the technical management of your website for you.